Axure can be a little cumbersome to maintain, especially with lots of pages and widgets. Having worked on a number of Axure prototypes (some very complex) I’ve discovered a few tricks that help me make prototyping more manageable and efficient.
1. Copy and paste interactions
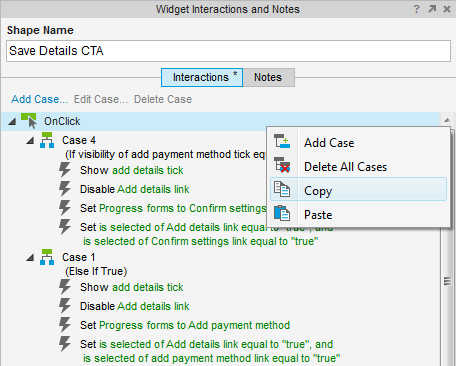
Copy and paste is an easily forgotten function when it comes to anything other than text, but it’s ideal for prototypes with large number of interactions. I once had a button that triggered 20 interactions across five conditions. There needed to be four of these that worked differently across the prototype and the prospect of recreating those wireframes was daunting. Thankfully, the copy and paste interaction feature cut down the amount of tedious recreation I had to do to build them all. Simply right click on an interaction in the Widget Interaction and Notes panel to find the copy and paste function. Alternatively, the conventional control + C + V will do the trick! TOP TIP: you can copy and paste an entire case or a particular interaction.
2. Label consistently
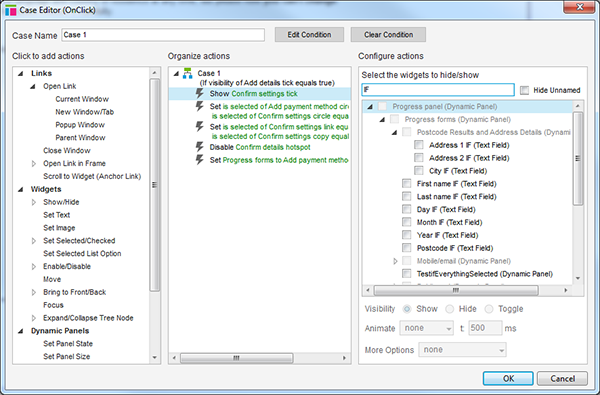
Consistent labeling of widgets, dynamic panels and variables makes it easier to create interactions thanks to the text search feature. TOP TIP: anything that will be affected by an interaction should be labelled. For example I tend to label widgets as follows:
– If it’s an input field I add IF (stands for input field) to the end of the label, so it will look like this “widget description IF”
– If it’s text that will change due to an interaction I label as “Type of copy COPY”
This way, if I need to make an interaction involving an input field, I can filter the results by typing IF into the select widget option.
While you should choose your own labels, for team projects establish a consensus on how you will label your widgets, dynamic panels and variables. Trying to figure out interactions made by a team member can be time consuming.
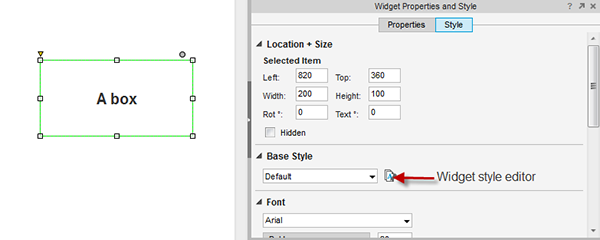
3. Widget style editor
If you’re unfortunate enough to be applying different button styles after creating 30 of them scattered across a prototype, then you will appreciate the value of having the widget style editor. You can use it to create custom styles that can be applied across your prototype. No more hunting and applying style changes individually. They also work for interaction styles so your mouse over or widget selected style can all be manipulated at once.
4. Scaling height and width
This is helpful for quick image or button scaling. Click on the height box and when it is highlighted, hold the shift key and use the up or down arrow key to change both the height and width of the widget. However, this does not work with the width box.

If this is not enough for you and you’re hankering for more Axure tips, we have two brilliant classroom courses that’ll have you prototyping like a pro in no time: Axure, and advanced Axure. If you have any tips of your own, feel free to share them in the comments!
SOURCE: http://www.webcredible.com