Axure is a powerful prototyping software with a lot of history. It has been around for many years and is available for Windows and Mac. Axure gained a lot of functionality over time, and today you can look at Axure as all in one tool. You can basically create a lot of UI/UX artifacts without leaving it.
Prerequisites
You don’t need to have any previous experience with Axure to follow along with this article, but if you do have, maybe this article can help you to shed some light on some core concepts related to interactions and prototyping in general, that are usually misunderstood or not so obvious for designers.
What are we trying to address within this article
Designers coming from other screen design tools like Sketch, Figma, Adobe XD can find it difficult to understand how Axure is actually working, the terminology, tools and how to build an interactive prototype.
Prototyping is an important step in UX methodology and can play a big role in improving the user experience. A prototype is a simulation, usually used to help understand and test how an application (or feature) works, what it does and how to interact with it.
In order to create any kind of prototype you will need to add interactions to some of your design elements.
Axure is regarded as a software with a steep learning curve, and the reason is clear: it has a lot to offer, there are a lot of features packed and this is not so obvious at the first glance.
In general, you can do a lot in Axure. You can do wireframes, diagrams or high-fidelity UIs (like you usually do in Sketch, Figma, Adobe XD) but in this article we will focus on the prototyping interactions part. So, I’m not gonna do a deep dive of Axure interface and features simply because it is not the scope of this article and I would probably need to write an entire chapter of a book.
Let’s begin
If you have used screen design tools like Sketch, Figma, Adobe XD or any other general design tool like Photoshop, Affinity then you are pretty much used with the tool metaphor. Tool metaphor? Let me explain.
The way these apps model the interaction is by using existing mental models that people have with tools in real life.
In real life when you want to build something, you are using different tools to achieve this. So, for instance, if you want to do a watercolor painting you are going to use a glass of water and brushes. Both, the brushes and the glass of water, are tools to help you place the colors on the canvas to accomplish your watercolor masterpiece.
In software applications you can use these existing mental models and add on top of them conceptual models.
Next, I’m gonna try to explain the conceptual models used in these kinds of applications by breaking them into levels. Each new level adds more abstraction and knowledge on top of the previous one.
First level
So let’s take for instance Affinity Photo (which is very similar to Photoshop) and see how this conceptual model that I’ve described earlier it’s used. All the available tools are represented by an icon in the tools toolbar. You interact with the tools in the same way you interact in real life, you pick the tool and use it to draw something (of course we need to make sure we’ve set the right colors) on the artboard (just a note here, I’ve simplified this example a lot, but you get the idea).
We, as designers, interact with the same concepts and, in most cases, the same terminology from the real life like:
- Tools: Pencil; Brush; Eraser
- Canvas
- Artboard
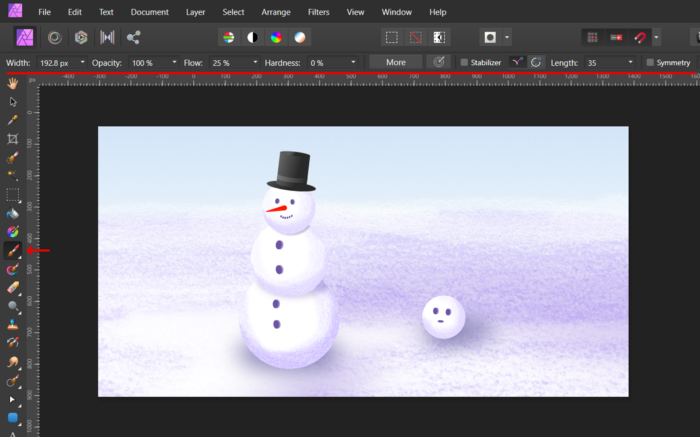
As you can see these tools help us to place the colors on the artboard. The way the colors are applied is in our direct control through the tool.
So the conceptual flow for the first level has these steps:
- Pick the tool (make sure we have the correct colors setup)
- Place the colors on the artboard
Second level
Let’s now go a little bit further and continue with our example of using Affinity Photo and try to use the rectangle tool which adds a vector (object) rectangle on the artboard. If you are familiar with vector drawing apps then there is nothing new up to this point everything should be familiar.
But there is something different here, we’ve used a special tool, the rectangle tool in our case, to place a rectangle object on the artboard; basically we no longer place colors directly, but the object renders its geometry using some attributes that we can change.
This is actually a big change because behind the scene the software is doing the heavy lifting like drawing the geometry using sophisticated mathematical functions. All we do is to change some of the properties that impact the behavior of these mathematical functions.
It’s interesting to note that, on this level, the tool and the conceptual model are already more abstract than on the first level, but for now we don’t have problems adapting because we used this model in other similar apps.
Let’s recap, we can use special tools (e.g rectangle tool, pen tool, ellipse tool and so on) to create objects and then manipulate their properties to fit our needs.
So the conceptual flow for the second level looks like this:
- Pick the tool
- Create the object
- Change the object properties
Third level
Now it’s time to leave the familiar world of Affinity Photo and move to Axure where we have similar objects like the ones that I’ve previously described but there are some key differences.
One key difference is related to the terminology.
For instance:
- Artboards = Pages (in Axure there are no artboards only pages and you can see only one page at a time)
- Objects = Widgets (Axure refers to the objects as widgets, just to make us a little bit aware that are more special than the objects that we are use to, and we will see this in a bit)
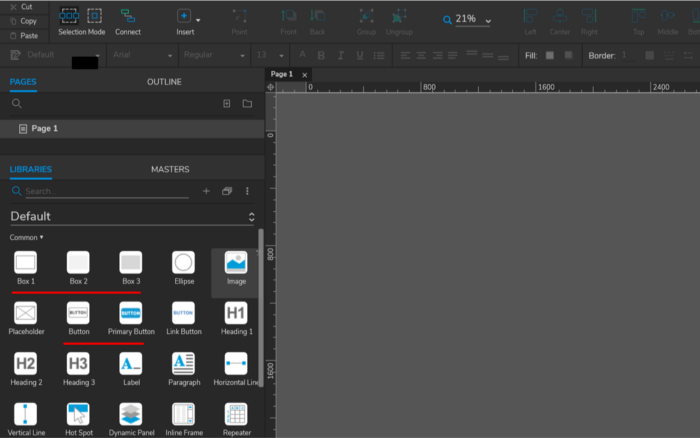
Another key difference is in the way we create these objects and place them on the page. In Axure, in general, we create new objects by dragging them from the Library pane into the page. This is a little different conceptual model than the one we’ve used before. The Library pane holds some ‘templates’ (sometimes referred to as blueprints) that we can use to create new objects.
However, as a quick note, Axure allows us to use the tools conceptual model as well but the type of objects that we can create is more limited.
So, why is Axure calling these objects widgets? Simply put, they are a little more advanced. As in the second level example, they have properties that can be adjusted but they can also respond to events.
This possibility to respond to events is the key ingredient in creating any kind of interactions (interactivity) in Axure and in many other similar tools which are heavily influenced by Axure.
To sum up, the conceptual flow looks like this:
- Create a new object (widget) by dragging it from the Library pane
- Change the object (widget) properties
- Optionally: Respond to the events of the object (widget)
Axure widgets
Now that you have been introduced to Axure widgets let’s explore them in more depth.
Within the app, Axure groups these widgets in categories which are inside libraries and they are available within the app in the Library pane. These widgets sometimes are listed multiple times under a slightly different name but with different default settings, for instance the rectangle widget is available as Box 1, Box 2, Box 3, Primary Button with some different initial properties like: fill color, border, corners and so on. In essence they are the same widget but with a setup for a predefined purpose (again, like a template).
On Axure documentation these widgets are grouped based on their packed functionality in 2 categories like basic and advanced but, I would group them in 3 categories:
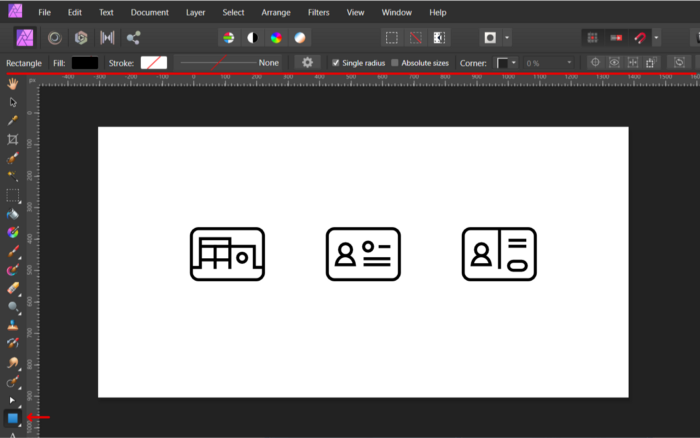
Basic (in this category are shape widgets that are familiar in general with any UI/UX designer and some specific ones used only in some cases)
In this category we have the following widgets:
- Line
- Rectangle
- Elipse
- Image
- Placeholder (used usually for wireframing purposes)
- Connector (used for diagrams or flows)
- Hotspot (non visual, used to define an area on the page to be used as a link to another page or to simply trigger and action)
- Snapshot (it embeds a image view of a different page)
- Inline frame (it embeds external content inside the page)
Semi-advanced (these offer additional user input in general or are part of the common UI patterns)
- Text field
- Text area
- Droplist
- List box
- Checkbox
- Radio button
- Tree
- Table
- Classic menu (horizontal/vertical)
Advanced (these have some advanced functionalities that I’ll touch on a future article)
- Dynamic panel
- Repeater
Each of these widgets have a set of common properties and events and specific ones.
Axure interaction model
The interaction model is inspired from RAD (Rapid Application Development) tools in general, and one difference is that we don’t write any code.
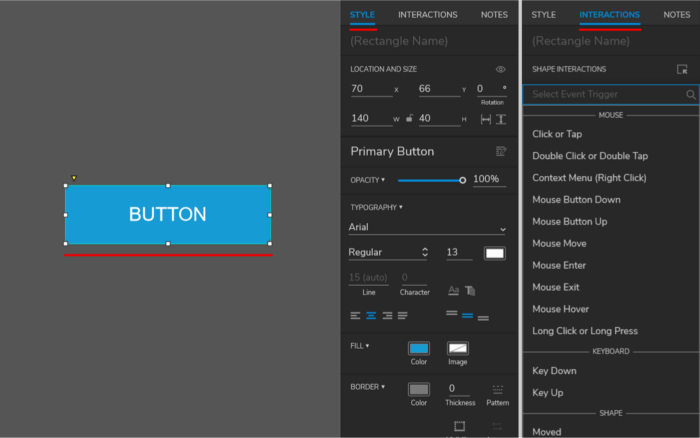
In order to make it easier to follow, let me introduce you to some of the terminology:
- Event — it’s a thing that happens at a specific moment and a widget can listen to specific events like: Click or Tap, Mose Down, Mouse Move, Mouse Up
- Trigger — this is what initiate the event
- Action — represent part of the response to an event
If you don’t fully understand what they are, don’t worry I’ll explain them and their relation down below.
In order to build (design) our prototype we place inside a page multiple widgets and adjust their properties and/or respond to different events (like the Click or Tap event) using actions. Also a prototype can have one or more pages depending on the needs.
Let’s see how this model works in Axure (see the image below).
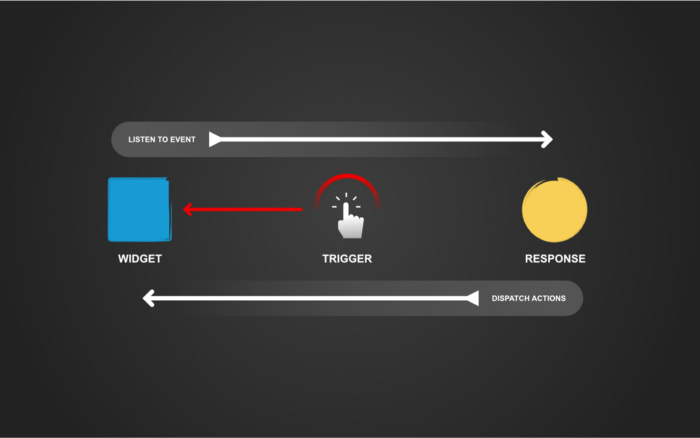
So, each widget can listen to events, the events are triggered by an interaction and the response to an event can be an action or a list of actions.
Now that you’ve seen the relation between these concepts you should have enough understanding about the underlying interaction model.
This is it for now, in future articles we will learn more about these interactions, how to use them and also we will learn about other concepts like states, conditions and expressions.
Original post you can find here: https://uxdesign.cc/understanding-axure-rp-9-for-ui-ux-designers-part-1-interactions-96ff62b5f657