I class myself as an expert in very few things. UX design, usability testing and user research are some of the areas that I have significant expertise in (along with the complete works of Father Ted), another is prototyping with Axure. As they proudly state on their website, Axure is used by 80,000 design and business professionals and has probably become the number one prototyping tool of choice for UXers everywhere. Having used the tool for well over 5 years I now count myself as a bit of a black belt in Axure. As such I’d like to share some useful Axure hints, tips and advice.
1. Don’t get too carried away
Axure is a very powerful prototyping tool. You can create vast pixel perfect prototypes, with lots of interactions, with advanced logic, with dummy data (now using repeaters) and even now responsive pages. However, just because you can, doesn’t mean you should. It’s all too tempting to go to town when creating a prototype. As ultimately an Axure prototype is by its very nature a throw away prototype (take a look at the code it creates and you’ll wince) you should really be prototyping the bare minimum that you need. That could be the bare minimum for usability testing, for demoing to business big wigs, or simply for communicating the design to developers. Don’t get too carried away because Neil’s patented law of diminishing Axure returns stipulates that the more time you spend on an Axure prototype, the less return you get on that time.
2. If you can use a master, do use a master
Masters are fantastic and should be used wherever possible. No more having to update every individual page or panel. You simply change the master and Axure magically changes all the pages containing that master. Raised events can be used to deal with interactions between masters and pages, just remember to use sensible on event names, such as ‘OnCancelButton’.
3. Use the alignment tools
Axure has some really useful tools for aligning widgets. Simply select all the widgets and you can easily evenly space them out, or align them vertically or horizontally.

The alignment tools (circled) are a great way to easily align and space out widgets
4. Use pages over dynamic panels
Dynamic panels are brilliant but it can be all too easy to find that you’ve suddenly built an entire prototype from one page and hundreds of different dynamic panel states. I’ve found that it’s generally best to keep dynamic states to a minimum and to use pages where possible (rather than dynamic panels). Pages are easier to link to, appear in the prototype sitemap and with dynamic panels you often have to carry out complex onPageLoad interactions to preload a particular dynamic panel.
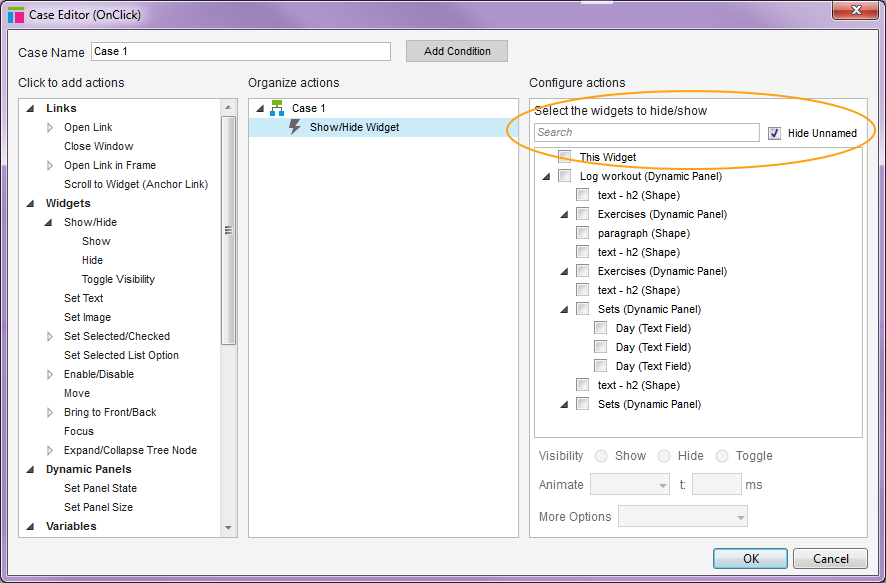
5. Use disabled states for tabs
When creating a set of tabs (or pills) the tempting thing to do is to create dynamic panels containing each of the different tabs. Unfortunately this means that if you need to change a tab, or perhaps add a new tab you need to change ever dynamic panel. A better way to do this is to instead have one set of tabs and use the dynamic panels for the tab content only. You can then use the disabled interaction style for the tabs (see below) to indicate the current tab (for example by changing the colour). On clicking a tab you disable this tab, enable the other tabs and change the dynamic panel to this tab’s content. Also don’t forget to disable the default tab so that it’s initially shown as selected. Changes to tabs are now much easier to make.
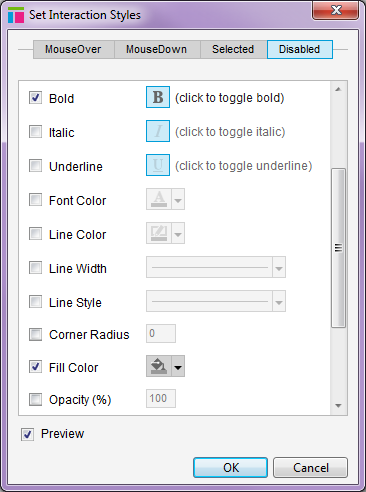
Used the disabled styles for a tab to indicate selection
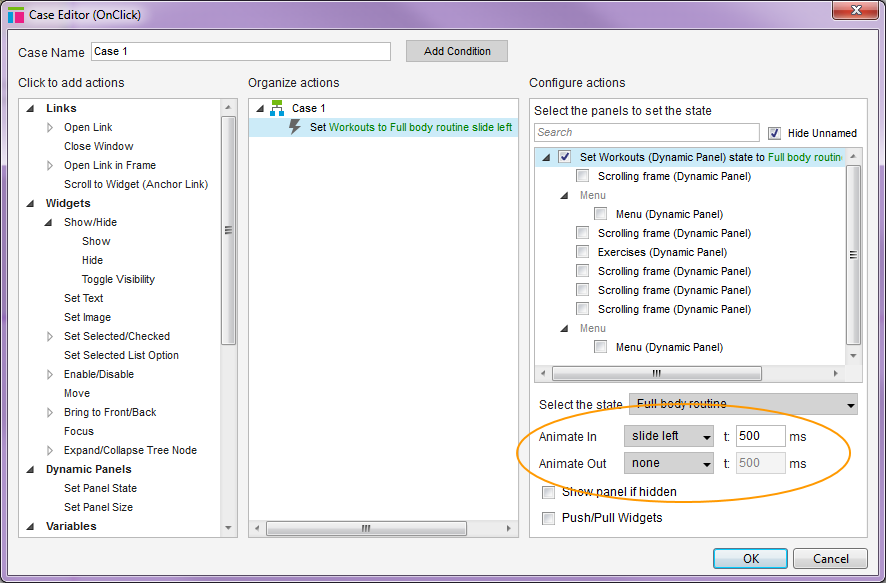
6. Use push & pull rather than moving panels
Previously if you wanted to prototype an accordion, or expanding panel you had to move all the other widgets or panels by a predetermined number of pixels. This was both fiddly and prone to error. Well, no more! Axure will now automatically move the other widgets about if you ask it to. Simply use the ‘Push/Pull Widgets’ option for panel changes (you can even add an animation) and watch as the other widgets magically rearrange themselves.
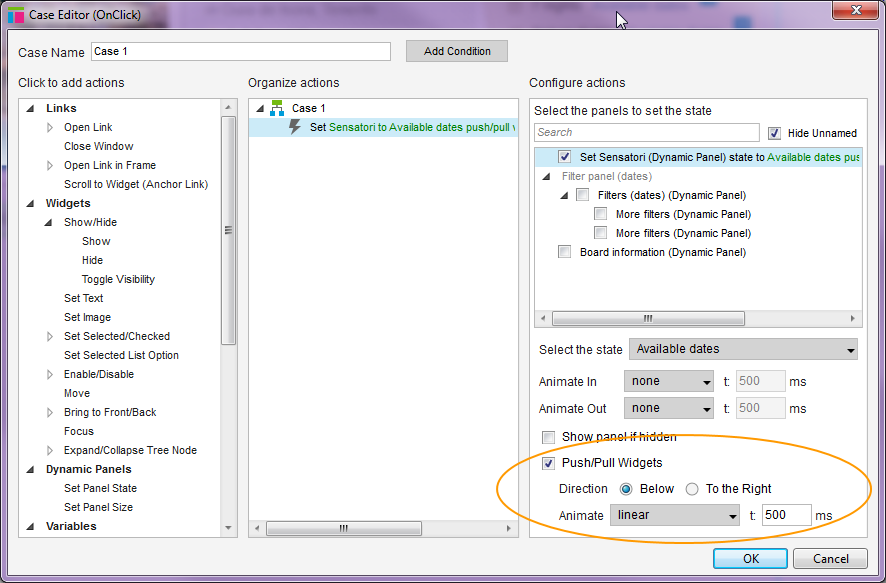
Use the Push/Pull Widgets option (circled) to automatically rearrange UI components
7. Use guides & grids
Guides and grids are great for prototypes because they make it much easier to keep things like spacing and alignment uniform. It’s a good idea to set-up the guides and grids for your prototype. You can do this using the ‘Grid and Guides’ option within the ‘Arrange’ menu. A 10px grid often works well (so that you can keep spacing to multiples of 10 pixels) and grids can be set-up to replicate a 960 or similar grid system.
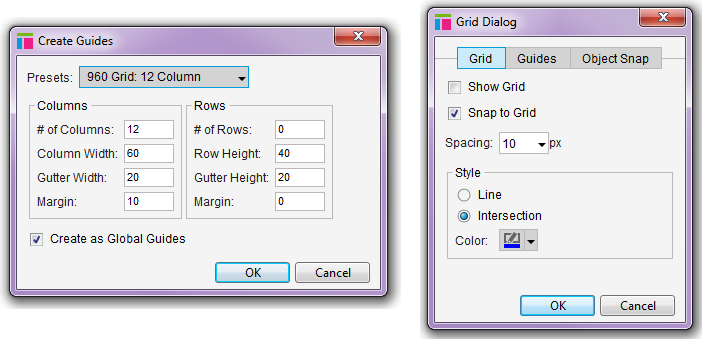
Use guides and grids to help keep spacing and alignment uniform
8. Use animations for more polished prototypes
OK, my first tip was not to go too carried away with your Axure prototypes, but a few choice animations and transitions can really help to add a bit of polish to your prototype. They can also be important for prototyping mobile apps, for example for showing transitions between pages, or a menu sliding in and out.
Add animations to give your prototypes a bit more polish
9. Use styles for text and buttons
The Axure style editor is a really useful feature because it allows you to change the default style for widgets, such as text, buttons and tabs. More importantly it allows you to set-up and assign custom styles. This makes a lot of sense because if for example you want to increase the text size in your prototype, you can simply change the relevant style rather than having to individually change each text widget. Axure even lets you copy the formatting from an existing widget so it’s now even easier to set-up custom styles.

Use the widget and page style editors to make it easier to change styles across the whole prototype
10. Use page styles
I’ve found it useful to not only use the widget style editor, but also the page style editor. This allows you to set-up and assign styles for pages. For example the alignment, background colour and level of sketchiness. In the past I’ve wanted to show early prototypes as quite sketchy (to reinforce the fact that they are early designs) and therefore have set-up a sketch style for this. Using a page sketch style is much easier than having to individually change all the style settings for each page of the prototype.
11. Utilise widget libraries
Rather than reinventing the wheel I find it much easier to see if someone has already built an Axure widget that can be used. There are loads of Axure widget libraries out there, covering everything from web design to mobile apps (Android, iOS and Windows mobile) and native applications (Windows and OSX). The widget libraries page on Axure.com is a good place to find Axure widgets. Some libraries require payment but there are also plenty of free ones out there.
12. Create your own custom widget libraries
Not only is it a good idea to use other people’s Axure widget libraries, it’s also a really good idea to create your own custom widget libraries. If you have an established style guide and set of design patterns for a particular site or app it can be useful to create a custom widget library for that site or app. In the past I’ve created custom widgets for everything from text to buttons, icons, tabs, forms, alerts and dialog boxes.
13. Use good widget naming practice
The quickest way to find a widget in Axure is using the search box (with ‘Hide unnamed’ checked), rather than trying to browse the various panels and widgets. It’s therefore important to give any widget that you’re going to be playing around with a name and to use good naming practice. I generally use the type of widget followed by an identifier. For example ‘ButtonStartTimer’ might be the name for a button with the label ‘Start timer’. This means that I can quickly and easily find the right widget.
Searching for widgets is generally easier than browsing, just remember to name your widgets and use good naming practice
14. Highlight clickable items
It’s very rare to create a prototype for which every button, link and interaction is clickable (or tappable). Generally some links and buttons will work, but not all so it’s a good idea to make it clear to prototype users what they can and can’t click. A good way to do this is to add a hot spot over clickable parts of a screen (with the associated click interactions), and to assign a transparent fill style for these hot spots. Using a style is a good idea because it means that you can easily turn the highlighting on and off just by changing the hot spot style.
It’s a good idea to highlight clickable / tappable elements in your prototype
15. Use variables to fake data
Axure has introduced repeaters and data sets for faking lots of data within a prototype. I personally think that it’s rare that you would need to get that advanced (you would probably be taking things too far – see tip 1), but when you do need to fake a bit of data, such as pulling through product details from a dummy set of search results it’s better to use variables to do this rather than manually setting the values for widgets. Using variables means that you can use pages and masters as templates and generally keeps things cleaner and more manageable.
16. Prototype mobile apps & websites
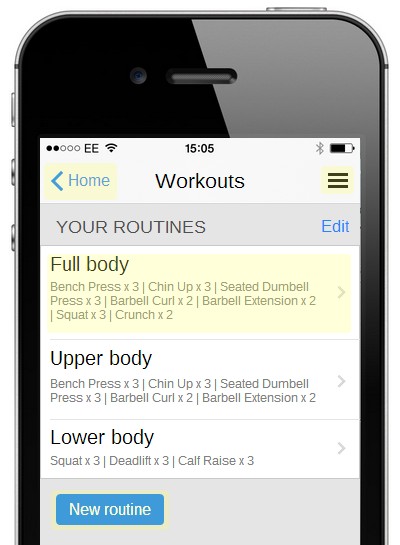
We all know that Axure is great for prototyping websites but it’s also pretty good for prototyping tablet and mobile websites and apps (I say pretty good because it’s by no means perfect). As you can see from my mobile app for logging workouts you can create quite convincing mobile app prototypes using Axure. Take a look at Axure’s mobile website tutorial for more information and also have a read of the excellent Advanced mobile prototyping in Axure: tips and examples.
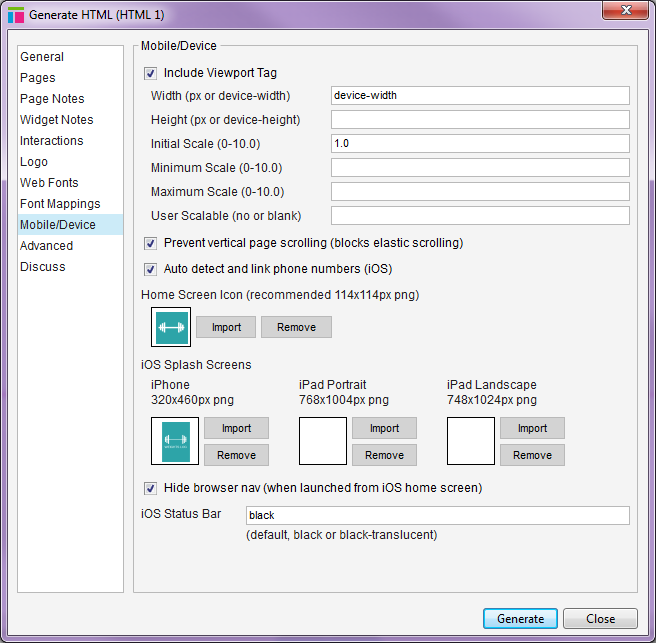
Use Axure to prototype mobile apps and website. Remember to check the ‘Include Viewport Tag’ box when creating a mobile prototype.
17. Save mobile prototypes locally
If you’re using Axure to create a mobile or tablet app (see above tip) then it’s useful to be able to access your prototype offline (i.e. in the absence of Wi Fi or a mobile data connection) so that you can test it with people when they’re out and about. Fortunately you can now do this using the rather splendid ProtoSee app. With ProtoSee you simply zip your prototype up, upload it to DropBox and then import to your mobile device of choice to be viewed offline. Very useful!
18. Create responsive prototypes
Did you know that Axure now allows you to create responsive prototypes using Adaptive views? I’ve found the feature to be a little fiddly and to be honest it’s rare that you would actually need to create a responsive prototype (rather than separate mobile, tablet and desktop versions). However, it’s useful to know that you can if you need to.
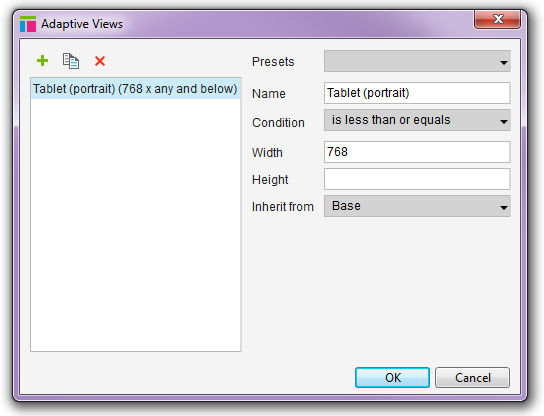
Using Adaptive views you can now create responsive prototypes
19. Utilise team projects
If there is more than one of you working on a prototype then I’ve found it a good idea to set the prototype up as a Team project, rather than having to continually import pages and elements from someone else’s version of the prototype. A team project allows you to check pages, masters and styles in and out to ensure that only one of you is making a change at a time.
20. Host prototypes locally
Some browsers, such as Chrome require an extension to run Axure prototypes locally. This can be bypassed by running the prototype on a local webserver using something like Wamp or XAMPP. This also has the added benefit of allowing a prototype to be securely accessed over a local network, rather than having to upload the prototype to Axshare, or hosting it somewhere else online.
21. Utilise web fonts
Axure uses OS (operating system) fonts, but it creates web based prototypes so there can sometimes be a mismatch between the font used to build the prototype and the font seen by everyone online. This is where web fonts become very useful because Axure allows you to map an OS font to a web font so that you’re prototype appears as intended. For example, for my mobile app for logging workouts I mapped the ‘Montserrat’, sans-serif font used within the prototype to the Google Arimo font, which very closely resembles Helvetica Neue (the font used by iOS, which is not standardly available for Windows). Take a look at the 10 steps to get web fonts in your Axure 7 prototype by Revi Körnmann for help using web fonts in your prototype.
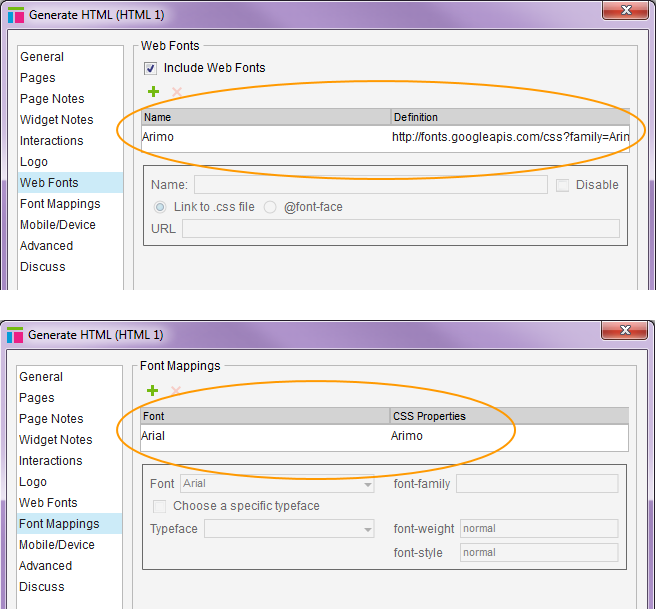
Use web fonts and font mapping to ensure that your prototypes appear online as you intended them to
22. Keep previous versions of pages and masters
If you’ve not set-up a Team project (see tip 19) then you have to no way to automatically retrieve a previous version of a page or master. Instead of overwriting or deleting a previous version of something I’ve found it a good idea to save previous versions in their own folder within the prototype. You can then exclude these pages and masters when you create your prototype, but can still access them if you need to.
23. Transfer prototypes as ZIP files
When Axure creates an HTML prototype it generally creates hundreds, if not thousands of different files (I have Axure prototypes with over 2,000 files!). This can make for very slow (and I mean VERY SLOW) transfer of files between computers, or even worse when uploading to a webserver. It’s therefore a good idea to zip the files up, transfer and then unzip once they are on the other computer.
24. Use Axure for expert evaluations & usability testing reports
I’m sure that you’ve created lots of Axure prototypes in the past but have you ever thought of using Axure to capture expert evaluation feedback, accessibility feedback, or even usability testing feedback? Axure is great for all these things. You simply take a screen grab of the pages (I use the excellent FireShot), add notes via the Hot Spot widget (I usually set up custom fields for the issue, severity and recommendation) and can then export as either an HTML prototype or Word doc (using the Generate Word Documentation option).
25. Have a go!
My final tip is to simply have a go at using Axure to create prototypes. Perhaps create a mobile prototype, responsive prototype or mobile app prototype. You learn so much more by actually using Axure (like any tool), rather than trying to learn everything through articles, tutorials and videos. Have a go and let me know how you get on…
SOURCE: http://www.uxforthemasses.com